
Repair Cabinet with Cut-Out Side Wall and Cut-Out Back
Repair Cabinet with Cut-Out Side Wall and Cut-Out Back
Side and Back Panel of Cabinet Had to be Cut Out to Access Behind
Last Updated: April 8, 2025 @ 12:19 AM, Originally Posted: March 6, 2025 @ 09:54 AM
A cabinet blocked access to something where a service call to fix something else, resulted in the need to cut through the cabinet. Unfortunately, that service call did not include the repair of this cabinet after the fact. However, fortunately for you and me, is that I get to be productive and fix something, and you get the opportunity to see some ideas on how to fix something like this, if you are looking.
-
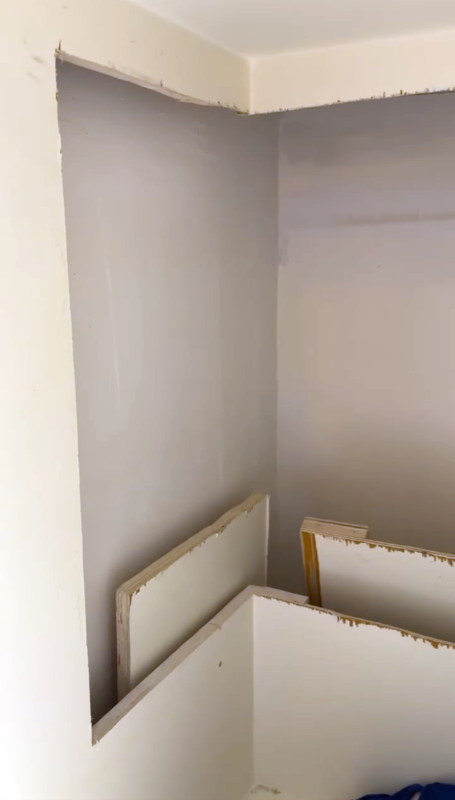
Overall Interior View of Cut-Out Side Wall and Cut-Out Back of Cabinet
Overall Interior View of Cut-Out Side Wall and Cut-Out Back of Cabinet
-
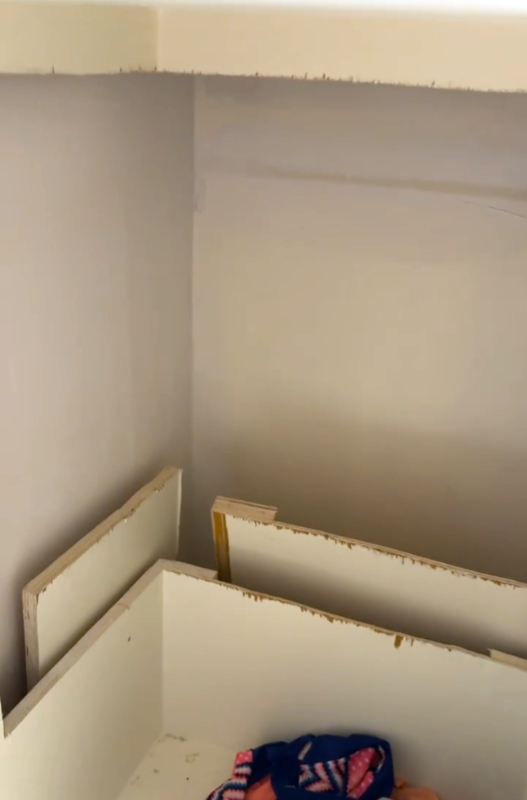
Closer View of Corner of Inside of Cut-Out Side and Back of Cabinet
Closer View of Corner of Inside of Cut-Out Side and Back of Cabinet
-
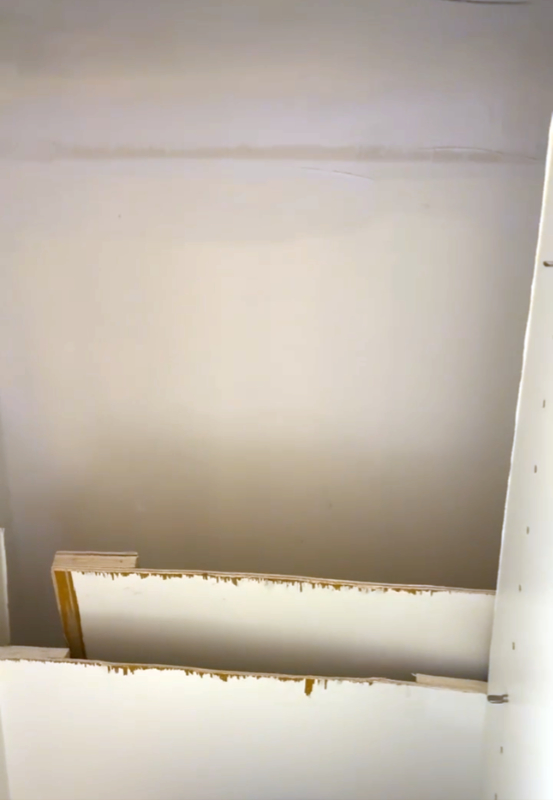
Closer View of Cut-Out Back Wall of Cabinet
Closer View of Cut-Out Back Wall of Cabinet
A quick examination of the cut out boards, revealed that they are 3/4" plywood, which led to the thought that the use of pocket holes could potentially be used to reattach the cut out cabinet wall and back, back onto the cabinet.
Learn How to Use a Pocket Hole Jig Video Tutorial to Use In Reattaching The Wall and Back of Interior Cabinet
This video is a beginner's guide to pocket hole joinery, a technique that allows you to build strong structures without needing special skills or experience. The video covers the basics of using a pocket hole jig, including how to adjust it, drill holes, and drive screws. It also discusses the importance of using the correct screw length and thread type for different types of wood.
Notes on How to Repair a Cabinet Where a Side and Back Panel Has Been Cut Out
-
Assess the condition of the interior cabinet, cutout wall, and cutout back - as well as the ability to accept pocket holes.
-
Develop plan of action, take notes, and maybe produce a checklist to follow the steps.
-
Looking at the closer view of the back panel appears to be an unpainted, which means that side wall butted into the back, which means, I can pocket hole attach the side panel to the back panel.
-
The back cutout cabinet panel appears to be 1/4" or less in thickness, but both ends appear to be reinforced with 3/4" thick plywood. We can use pocket holes to reattach on both sides of the back, but we are also considering to reinforce the middle of the back panel, top and bottom using some custom cut thin strips of wood, using a 18 gauge brad nailer using 5/8" brad nails.
-
Then, the left cut-out cabinet wall is fully 3/4" in thickness, we should be able to put pocket holes on both sides, top, and bottom.
-
If everything feels secure, and you're okay with it unfinished looking, we can sand and clean up.
-
Phase 2: Finishing and Polishing - Use some wood glue and pocket hole plugs to plug up and fill the pocket hole screw holes. Allow time for glue to dry.
-
Fill all void edges with wood filler. Then allow time to dry.
-
After initial drytime, use flush cut saw to flush cut all pocket hole plugs.
-
Do quick light sand (maybe 200+ grit), maybe using manual hand sanding sponge. Then reapply more wood filler if desired or needed.
-
If added more wood filler, do another light sand and clean wipe down.
-
If ready and done, can be ready for primer or paint to complete the interior cabinet wall and back repair.
Estimated Cost
$0-40 USD
Relatively inexpensive here if all you are using all consumables that you may already have - it could cost you nothing out of pocket.
On the other hand, if you need to buy every consumable, it could likely run up to around $40 USD easily.
Estimated Time
30 Minutes to Few Days
Depending on Form and Function. If only concerned with Function (Stabiilty and Time Savings Efficiency)- it could be a very fast job. However if additionally looking for Form too - Look to Plug, Fill, Sand, and Painting, as well.
Estimated People
1-2 People
This task can be completed by a single individual, however it's always nice to have some help.
Some Tools and Materials Needed for Fixing Cutout Sides and Back of a Cabinet
Personal Protection Equipment
Materials and Supplies
Hand Tools and Other Equipment
Power Tools
cabinet, pocket holes, in planning
Read more …Repair Cabinet with Cut-Out Side Wall and Cut-Out Back
Repair Sagging Fence Gate Door
How to Repair a Sagging Fence Gate Door
Fence Gate Door Sags and Drags on the Ground When Opened
Last Updated: April 7, 2025 @ 08:18 PM, Originally Posted: March 3, 2025 @ 10:55 PM
A fence gate door drags on the ground when opened. The first thing checked was to see the condition of the fence gate door from the outside, then the inside, along with determining how far out the gate latch is from the hole it's suppose to sit in. Finally, the post that the door is connected to is checked for plumb.
The problem is that the wood that makes up the fence gate door is old and semi deteriorating already, and the weak wood is sagging. The best fix would be to rebuild and replace the door with all new wood.
-
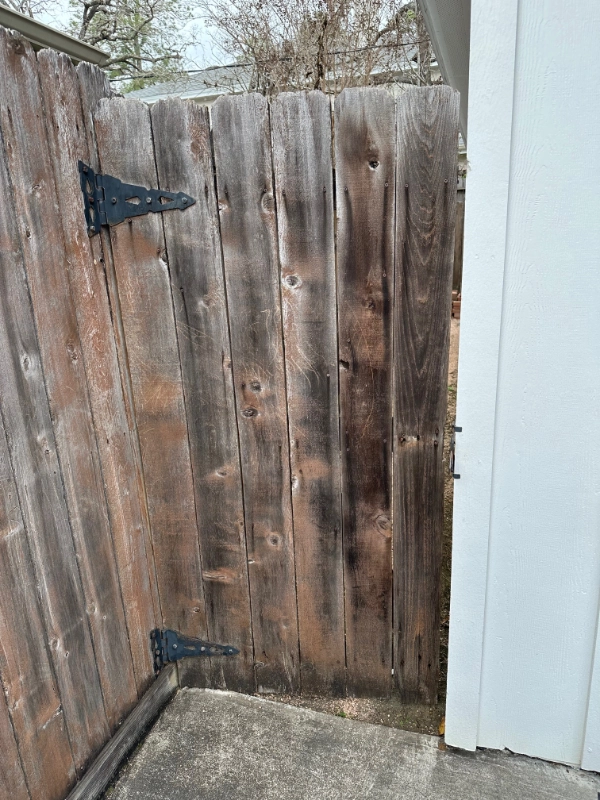
Exterior View of Fence Gate Door that Sags and Drags on Ground When Opened
Exterior View of Fence Gate Door that Sags and Drags on Ground When Opened
-
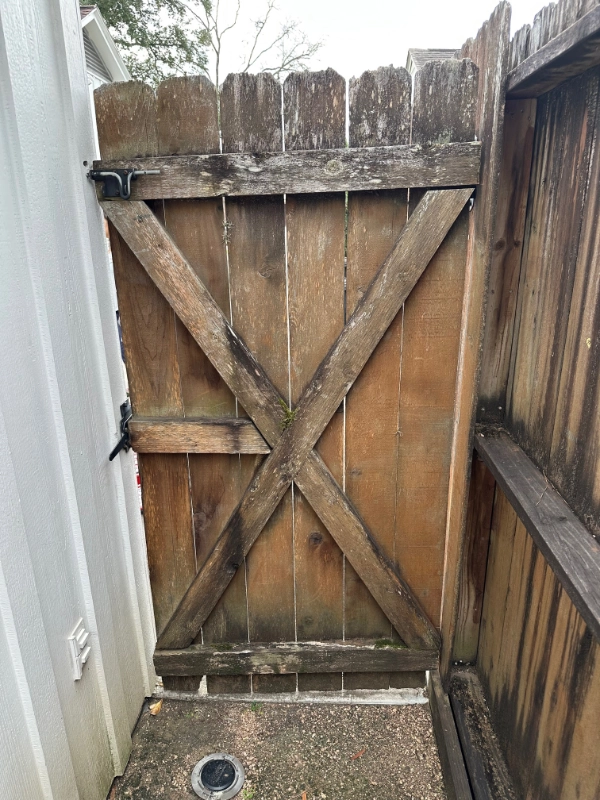
Interior View of Fence Gate Door that Sags and Drags on Ground When Opened
Interior View of Fence Gate Door that Sags and Drags on Ground When Opened
-

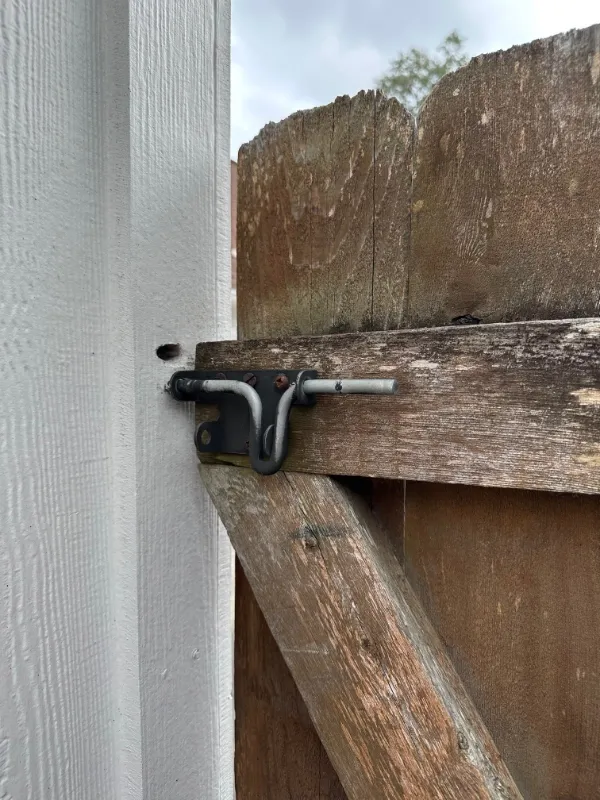
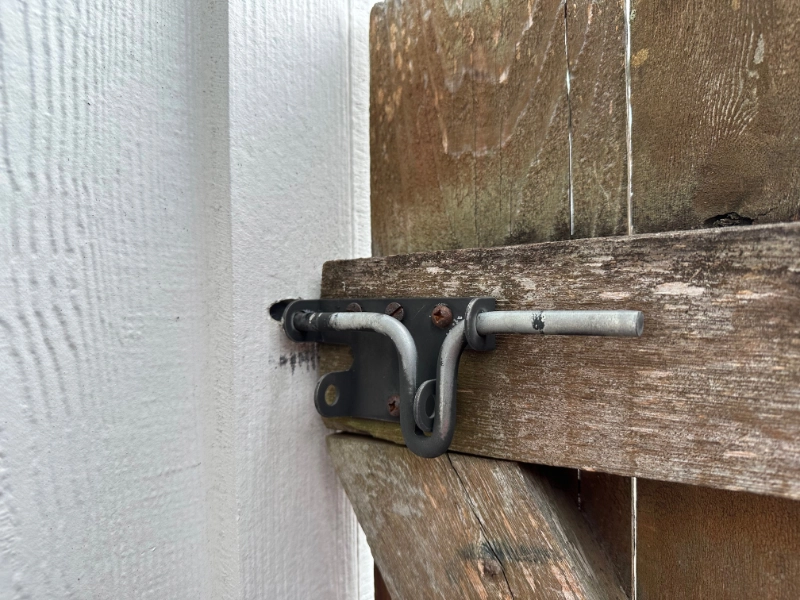
Close Up of Fence Gate Latch That is Far From Hole it is Suppose to Sit In
Close Up of Fence Gate Latch That is Far From Hole it is Suppose to Sit In
-
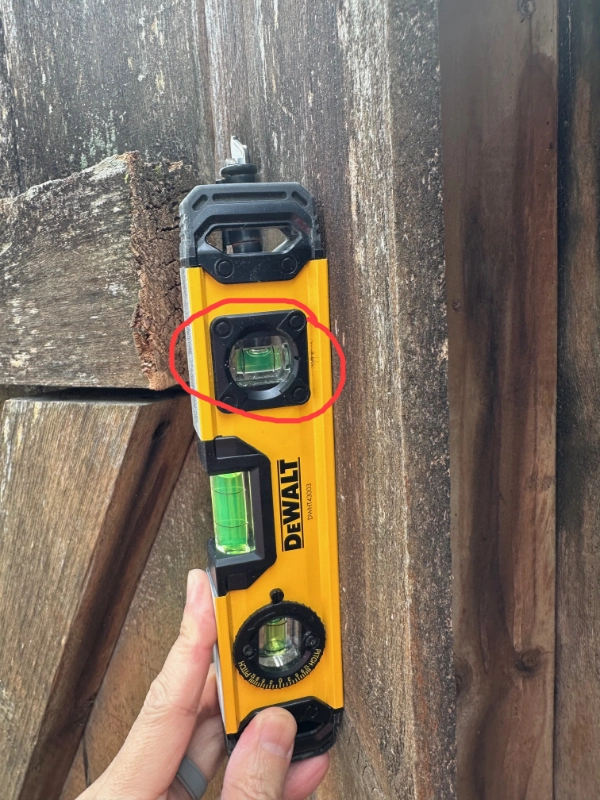
Fence Gate Post That the Fence Gate Door Is Connected To, Is Plumb
Fence Gate Post That the Fence Gate Door Is Connected To, Is Plumb
However as a quick temporary fix, to use an anti-sag gate kit is going to be attempted.
Installing an Anti-Sag Gate Kit to Keep Fence Gate Door from Dragging on the Ground Video Tutorial
This video shows a quick installation of an Anti-Sag Gate Kit Installation. Through the updates in the description of the video, it appears that the Anti-Sag Gate Kit only worked for a short time before other issues began to arise, which lead to a followup video.
Notes on How to Repair a Fence Gate Door That Drags on the Ground
-
Assess the Fence Gate Door
-
Solidify the door by attaching screws to tighten up the boards into the fence gate door framing, as much as possible.
-
Install an Anti-Sage Gate Kit
Estimated Cost
$10-20 USD
Depending on need for screws and what Anti-Sag Gate Kit you purchase.
Estimated Time
15-45 Minutes
Depending on understanding the process and personal skill level.
Estimated People
1-2 People
This task can be completed by a single individual, however it's always nice to have some help.
Some Tools and Materials Needed for Repairing a Sagging Fence Gate Door
Personal Protection Equipment
Materials and Supplies
Hand Tools and Other Equipment
Power Tools
Temporary Conclusion to Fixing a Sagging Fence Gate Door
-
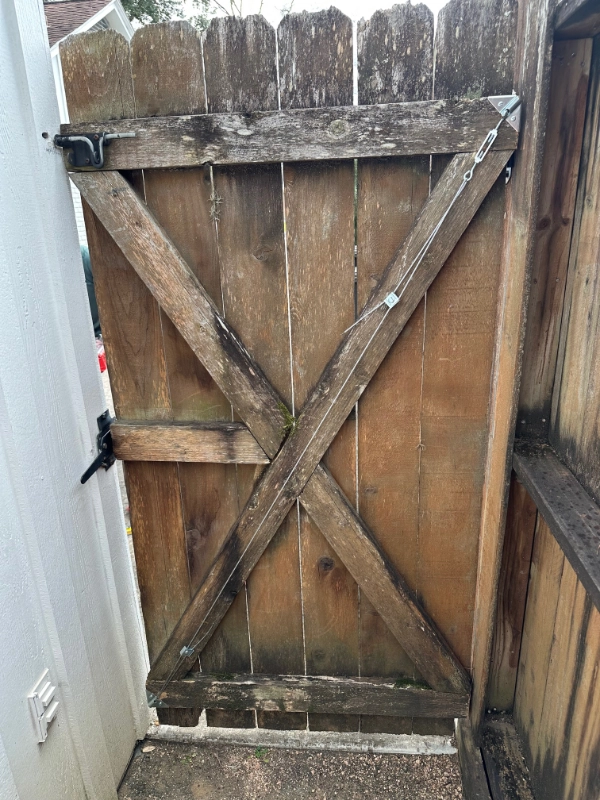
Interior View of Fence Gate Door that No Longer Drags on the Ground
Interior View of Fence Gate Door that No Longer Drags on the Ground
-
Close Up of Fence Gate Latch Closer Aligned to Hole it Sits In
Close Up of Fence Gate Latch Closer Aligned to Hole it Sits In
At the end of the day, the anti-sag gate kit seemed to work relatively well. The gate was so old and already breaking down, so it didn't take to new work on it that well. The fence gate latch did not quite reach where it originally was set to, however the fence gate no longer dragged on the ground.
Overall, I would call this a win. But as with all things in this world, it is continually being eaten, destroyed, and stolen (Matthew 6:19) - so take heart, this is not our home. We just have to deal with these kinds of things until we are all called back to our True Home. Keep the Faith.
Repair Water Damaged Rotted Framing
Repair Water Damaged Rotted Framing
Bathroom Renovation Revealed Water Damage
Last Updated: April 7, 2025 @ 08:24 PM, Originally Posted: February 26, 2025 @ 10:51 PM
I started on a journey to complete major renovations on my condo that was built in 1969 - and so I also decided to document some of the work, along with taking notes publicly to share with you all, in hopes that it may be of some value to you.
The bathroom was one of the primary rooms that desperately needed repairs and upgrades as the bathtub was all chipped up, shower tiles were dirty, moldy, and cracked in so many places, the toilet was cracked in multiple places, and the vanity probably had 30 layers of paint and wallpaper on it, along with the walls too. And just a plethora of everything was wrong with the bathroom. Needless to say, the easiest thing was to just start over, from the beginning.
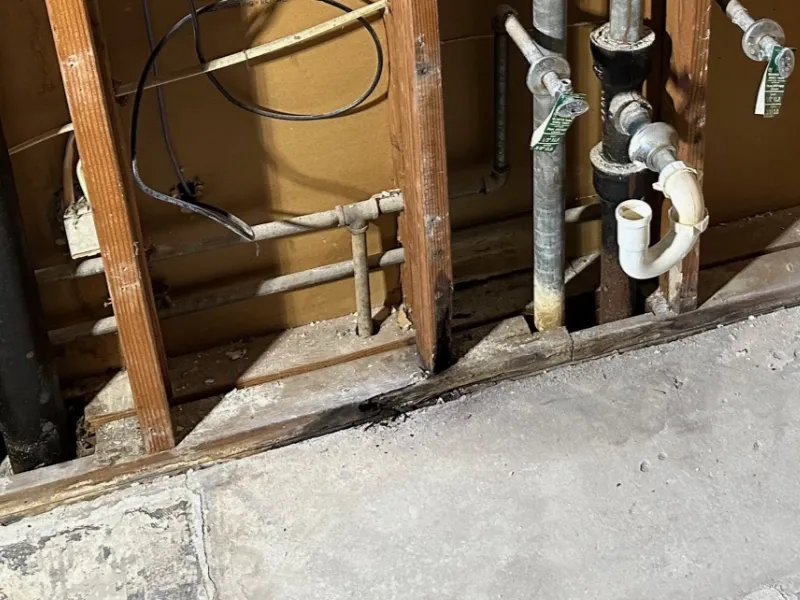
Completely gutting the bathroom revealed many atrocities in the original build out, but I believe that is just something to be expected in this day and age. Granted, the bathroom technology back in 1969 in the USA was certainly not as good and standardized as they are now, in 2025. Not to mention, perhaps some maintenance along the way could have prevented some of the current existing water damage to the sill plate along the framing.
I'm not exactly sure when and how the water leaked back there, but the damage could have likely been caused from overflowed water from the vanity counter over multiple days, weeks, and years - or perhaps leaky pipes over years dripping over the sill plate - it was behind the vanity, under the sink, and behind the wall, of course. Nevertheless, I think likely the water damage could have been done prior to my purchase of the property The area had now turned dark, crumbly, and weak, no longer offering any structural support.
This rotted wood certainly needs to get repaired and reinforced before any other work continues in the bathroom renovation.
Repairing Water Damaged Framing Reference Tutorial Video
This video follows a home renovation project, focusing on repairing rotten framing in a shower. The homeowner, Paul, explains the process of removing the rotten wood, replacing it with new pressure-treated lumber, and reinforcing the structure. The video also shows the initial steps of fixing the plumbing and electrical work, setting the stage for future renovations.
Notes on How to Repair Water Damage Sill Plate
Some Tools and Materials Needed for Repairing Rotted Sill Plate
Personal Protection Equipment
Materials and Supplies
Hand Tools and Other Equipment
Power Tools
water damage, rotted, framing, renovation, bathroom, in planning
